Buck Boost Converter Design
Buck Boost Converter Design
Before reading this section, please read the Introduction to DC to DC Converter Design. All of the circuits in this tutorial can be simulated in LTspice®. If you are new to LTspice, please have a look at my LTspice Tutorial.
Introduction
A buck boost power supply generates a constant output voltage when the input is either above or below the output voltage.
The SEPIC Converter (Single Ended Primary Inductance Converter) and the 4 Switch Buck-Boost Converter are the two main buck-boost architectures each with its benefits and drawbacks. The SEPIC converter will be discussed on this page.
The SEPIC Converter
The SEPIC Converter is the most common and long standing buck boost architecture and is illustrated in Figure 1.
Figure 1
The LTspice circuit can be downloaded here: SEPIC Converter.
The architecture is very similar to a boost converter. However with a boost converter there is a dc path that flows through the inductor and rectifier diode into the output capacitor meaning the output voltage can never be lower than the input voltage. With a SEPIC converter, capacitor C5 in Figure 1 breaks this dc path enabling the output of a SEPIC converter to start from 0V.
Another benefit of the SEPIC converter is that it can also act as a low noise buck converter. The conventional buck converter has sharp edges on the input current that can interfere with circuitry connected to the input voltage. With the SEPIC converter, the input inductor, L1, slows down the input current edges thus providing a lower noise buck regulator solution.
To analyse Figure 1 we will assume the input voltage is fixed at 10V and the output is in regulation at 5V. MOSFET Q1 turns on, shorting the right hand side of L1 to 0V (ignoring the small sense resistor R5) thus a fixed voltage is applied across L1. According to
if the voltage across the inductor is constant the inductor current ramps up linearly with time (di/dt is constant).
When the MOSFET switches off, the inductor tries to maintain its current flow. It does this by generating a voltage across its terminals very similar to a battery, where the current flows from the negative terminal, through the battery, to the positive terminal.
In the circuit of Figure 1, we can see that to maintain current flow, the right hand side of the inductor has to increase in voltage with respect to the left hand side. The left hand side is connected to the input voltage (so cannot change), thus the right hand side voltage increases above the input voltage. The inductor current flows into capacitor C5, thus charging C5.
To save a lot of maths, it is worthwhile considering the operation of the circuit from a common sense viewpoint. The dc voltage across an inductor, when averaged over time, must always be 0V. Thus, the average voltage at the drain of Q1 (labelled DRAIN) must be equal to the input voltage. Likewise the average voltage at the top of L2 (labelled ANODE) must be equal to 0V. Thus the average voltage across C5 is equal to the input voltage, Vin.
When Q1 switches ON, it puts a negative going edge on DRAIN. If the voltage across C5 is constant, this means a negative going edge of equal magnitude appears at ANODE. When Q1 switches OFF, the voltage at DRAIN rises until something conducts (to maintain the current flow through L1). If voltage across C5 is constant, the voltage at ANODE rises until D1 conducts, thus the voltage at DRAIN rises to (Vin + Vout).
Therefore the voltage at DRAIN node is a square wave oscillating from 0V to (Vin + Vout) and the voltage at ANODE is a square wave of the same amplitude, but offset by the voltage across C5 (Vin), thus oscillating from –Vin to Vout.
From the equation
when Q1 switches ON, the current in L1 ramps up linearly with time and flows from left to right. Since the voltage across the inductor is equal to Vin, the change in current with time is represented by
When Q1 is ON, the voltage at ANODE is equal to –Vin, so current flows UP L2 increasing in amplitude.
Since D1 is reverse biased, no current flows to the output, so all of the current flowing UP L2 flows into Q1. This has important consequences when choosing the current sense resistor, R7, as well as the characteristics of the MOSFET, Q1.
When Q1 switches off, DRAIN rises to (Vin + Vout) meaning there is a voltage of Vout across L1 so the current in L1 ramps down linearly according to
Thus we can see that the current in L1 increases proportional to Vin and decreases proportional to Vout.
Now we will consider the current in L2.
When Q1 switches ON, the voltage at ANODE goes to –Vin, so the current in L2 flows towards ANODE, increasing linearly with time and is given by
When Q1 switches off, the voltage at ANODE goes to Vout, so the current in L2 decreases linearly with time and is given by
Thus we can see, like L1, the current in L2 increases proportional to Vin and decreases proportional to Vout.
In Figure 2, we can clearly see the charge and discharge characteristics of L1 and L2 are identical. The input voltage here is 10V and the output voltage is 5V/1A and we can see a steeper charging slope than discharging slope. (LTspice probes the current flowing down L2. To invert this waveform, right click over the plot icon I[L2] and insert a ‘-‘ sign in front).
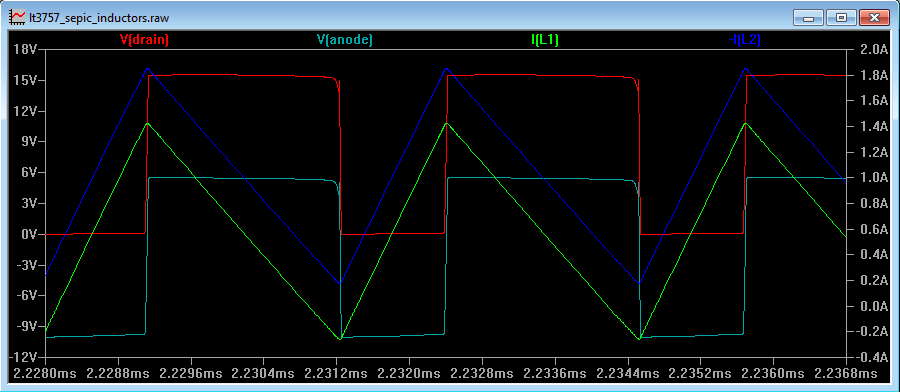
Figure 2
We can also see DRAIN oscillating between 15V (Vin + Vout) and ground and ANODE oscillating between –Vin and Vout.
It is useful to calculate the duty cycle of the SEPIC converter. Assuming the current flow in both inductors is continuous we can say that the change in inductor current during charging is the same as the change in inductor current during discharging. Hence, for L1,
It is useful to calculate the duty cycle of the SEPIC converter. Assuming the current flow in both inductors is continuous we can say that the change in inductor current during charging is the same as the change in inductor current during discharging. Hence, for L1,
Where dt1 is the charge time and dt2 is the discharge time.
Hence
Hence
If Duty Cycle (DC) is represented by
then
so
so
so
therefore
This is an approximation (but is good enough for most designs) since we have ignored the voltage drop across the diode. The higher the output voltage, the more the diode drop can be ignored and the more accurate the above statement becomes. This equation only holds true if the inductor currents never fall to zero. This is known as Continuous Conduction Mode (CCM) operation.
The same calculation can be done for L2 and since L1 and L2 charge and discharge at the same rate, the equation works out the same.
Now, we stated above that the average voltage across an inductor is zero. If this were not the case, the current in the inductor would rise over time. Likewise with a capacitor, the average current in a capacitor is zero, otherwise the capacitor voltage would rise over time.
We can use this observation to determine the currents in the input inductor and output inductor. If the average current flowing in C5 is zero, we can assume that C5 represents an open circuit when averaged over one switching cycle. Thus the average output current is equal to the average current flowing in L2. Likewise the average input current is equal to the average current in L1. If this were not the case then the voltage across C5 would increase over time.
SEPIC Converter Design Procedure
We are going to use the LT3757 to design a SEPIC converter that converts and input voltage of 4.5V-8V to an output voltage of 5V supplying a load of 1A with a switching frequency of 500kHz. The LT3757 datasheet can be downloaded here: LT3757 Datasheet.
The outline schematic is shown in Figure 3
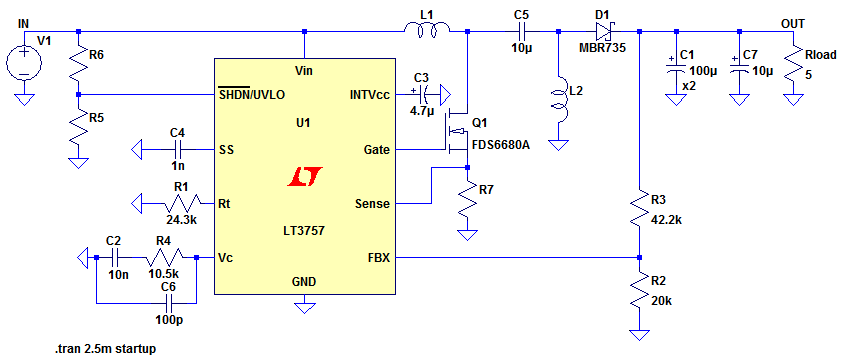
Figure 3
We need to design for the lowest input voltage, since this is when the input current is at its highest.
The duty cycle of the converter when operating in continuous conduction mode is given by
The duty cycle of the converter when operating in continuous conduction mode is given by
The datasheet says we need a 24.3kOhm resistor to set the switching frequency to 500kHz. With a switching frequency of 500kHz, this equates to a FET ON time of
At this point it is worth checking that we are not violating the minimum ON time of the controller (220ns).
Inductor Choice
The output current is 1A, so the average current flowing in L2 is 1A. If the output power is 5W and the circuit operates with an efficiency of 85%, this means the input power is 5.88W. At 4.5V this results in an average input current of 1.31A.
When the MOSFET switches ON we have seen that the currents in both L1 and L2 increase and both currents flow through Q1. Thus the average current in Q1 is 2.31A. It is generally good design practice to keep the ripple current in the switch equal to about 40% of the total average current. Thus the ripple current should be approximately 924mA.
To divide the ripple current equally between L1 and L2 we should design to make the ripple current in each inductor equal to 462mA. Therefore from
we get
Implying the inductors need to be 10uH.
The 462mA ripple current is superimposed on top of the average inductor current.
The average current in L2 is 1A so L2’s current should ramp from 769mA to 1.231A. The average current in L1 is 1.31A, so L1’s current should ramp from 1.08A to 1.54A. Naturally the average current in L1 is dependent on the efficiency of the converter.
Obviously if the input voltage is higher, the input current will be proportionately lower.
Therefore for L1, we need to choose an inductor with a saturation current of at least 1.54A and for L2 a saturation current of at least 1.231A. If too much current flows in the inductor, the ferrite that the inductor is wound on saturates and the inductor loses its inductive properties making the inductance value fall. From the equation
if the inductor value falls, the current ramp increases causing the ferrite to further saturate causing more current to flow…… Therefore must make sure that the inductor never saturates. To keep things simple, it is wise to choose both inductors to have a saturation current of somewhat greater than 1.54A.
Looking at the Wurth Website:
or using the Wurth Electronics Component Simulation Software
we can see that the 744778610 is 10uH with a saturation current of 1.8A
Using a Transformer
Since both inductor currents are in phase there is no reason why a coupled inductor cannot be used. A coupled inductor is simply 2 inductors wound on the same ferrite. However, when 2 inductors are wound on the same ferrite the mutual inductance between the inductors effectively doubles their inductance. Wurth have an application note (Transformer windings in series and parallel) that explains this effect and it is illustrated in Figure 4. If each inductor is 10uH and wound on the same ferrite, the net inductance of each inductor is 20uH.
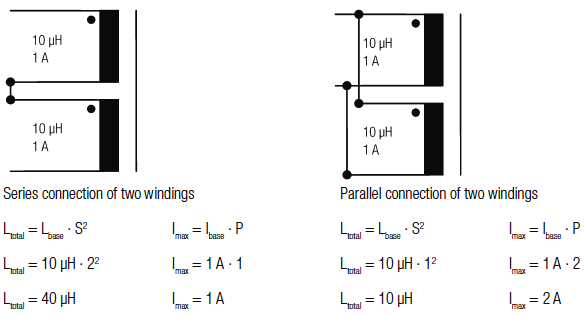
Figure 4
Since we have calculated a desired (individual) inductance of 10uH, if we use a coupled inductor we need the inductance of each coil to be 5uH. A coupled inductor often works out smaller in size than 2 separate inductors. Also, note the winding phase of the transformer as shown in Figure 7. A useful way to remember the phasing of the SEPIC is to consider removing the coupling cap - the SEPIC then becomes a flyback converter and indeed the circuit operation of a coupled inductor based SEPIC and a flyback are very similar.
A suitable coupled inductor from Wurth is the 74489430056. This is a 5.6uH, 2.2A coupled inductor
A suitable coupled inductor from Wurth is the 74489430056. This is a 5.6uH, 2.2A coupled inductor
On a note of simulation, LTspice needs a coupling coefficient of <1 to model coupled inductors. If we were modelling the ideal transformer (with a coupling coefficient of 1) we would insert an LTspice statement to the effect of:
K1 L1 L2 1
However, with a coupled inductor, we use a coupling coefficient of 0.9
K1 L1 L2 0.9
This can be seen in Figure 7 below.
As an exercise, it is interesting to evaluate Figure 7 with varying values of coupling coefficient. Figure 7 shows the coupling coefficient as '0.9' so not all of the energy from the primary is coupled to the secondary. This means some of the primary current flows through the coupling capacitor during its discharge phase. This allows the current in the primary to smoothly ramp downwards which means a transformer with an imperfect coupling coefficient can give less upstream interference than a circuit with a perfect transformer. If the coupling coefficient was '1' the current in the primary suddenly collapses and transfers its energy to the secondary, but the fast collapsing current can cause interference to upstream circuitry. If the coupling coefficient is '1', no current flows in the coupling capacitor and the coupling capacitor can be removed. The circuit is now identical to a flyback converter.
For a non unity coupling coefficient, current from both windings flows in the FET during the charge cycle. This is easy to picture if we consider the discharge cycle first. When the FET switches OFF, some of the primary current flows through the coupling capacitor. Since the average current in the capacitor has to be zero, this implies that when the FET switches ON, an equal and opposite current flows in the capacitor. Since the output diode is reverse biased, this current can only come from the secondary. So an imperfect transformer means lower upstream interference, but it reduces the efficiency since we now have primary and secondary currents flowing in the FET, thus increasing the FET losses. The current flowing from the secondary also has to flow through the ESR of the coupling capacitor, thus further increasing the losses.
Rsense Calculation
The minimum current sense threshold voltage for the LT3757 is 100mV. Since the currents in both L1 and L2 flow through the FET and sense resistor at the same time, the peak current can reach (1.231A + 1.54A = 2.78A). We have chosen inductors each with a saturation rating of 1.8A, so we can allow a peak current flowing through the sense resistor of up to 3.6A before encroaching on the saturation rating of the inductors. This implies a sense resistor value of 27mOhms. Choosing Rsense to be 30mOhms should allow enough margin for correct circuit operation without saturating the inductors.
MOSFET Choice
The MOSFET needs to be able to handle the peak current from both inductors so in this design a drain source current rating (Id) of 10A is more than sufficient. The Drain–Source voltage rating (Vds) needs to be in excess of the (Vin + Vout + Vdiode). Since our design specification has a maximum input voltage of 8V the drain voltage should never exceed 13V, so a MOSFET with a VDS rating in excess of 20V is suitable.
The Gate-Source turn on voltage of the MOSFET (Vgs) needs to be less than the input voltage, to ensure that the Gate drive voltage can actually activate the MOSFET. Logic level MOSFETs have a low turn on voltage, are widely available and usually perfect for low voltage dc/dc converters.
The above parameters represent the bare minimum characteristics of the MOSFET. However, to get a good design, we must ensure that the losses in the MOSFET are as low as possible. The MOSFET switch presents 2 losses in the circuit: switching losses and conduction losses.
The switching losses result from current flowing through the MOSFET at the same time that a voltage is across the MOSFET (so power is generated in the MOSFET), during the turn on and turn off times of the MOSFET. For a given gate drive from the controller, the lower the Gate-Source capacitance of the MOSFET, the quicker the MOSFET will turn on. Thus the Qg specification of the MOSFET is important and should be as low as possible. The Qg of the MOSFET also has an impact on the heat dissipation of the chip, especially if the input voltage to the chip is high.
Charge is dictated by the equation:
Charge (Q) = Current (I) x Time (s)
Since Frequency is the inverse of Time, we can write
So we can calculate the current needed to flow into the chip, just to charge the gate capacitance of the FET. Since heat is the product of voltage and current, if the gate charge is high and/or the switching frequency is high, the heat dissipation in the chip will be high if the input voltage is high.
Once the MOSFET has switched on, the MOSFET presents a small dc resistance between its Drain and Source terminals. This is the MOSFETs ‘Drain Source on resistance’ or RDSon. Again, this needs to be as low as possible, especially since both inductor currents flow at the same time though the MOSFET.
Now, MOSFET manufacturers reduce the ON resistance of the MOSFET by constructing many parallel conduction paths between the Drain and Source. Thus, like connecting resistors in parallel, the ON resistance comes down with more parallel paths. However, in connecting Drain Source paths in parallel, a negative effect is that the Gate Source capacitance (Qg) is also connected in parallel, so a low ON resistance (and hence low conduction loss) sometimes implies a high gate source capacitance (hence high switching loss). Thus the MOSFET that is chosen should be a compromise between these two characteristics. In addition, high current MOSFETs tend to come in much larger packages, so meeting the ideals of low ON resistance and low Qg might violate a space requirement spec, so the selection process has to start over. Engineering, as ever, is a compromise.
Indeed looking at the selection tables of the MOSFET manufacturers, it is better to select a MOSFET with a low ON resistance (less than 10mOhms), then filter this selection to remove MOSFETs with a Qg of greater than 10nC, then select a MOSFET from this list, as long as the Gate turn on voltage, Vds and Id can be met. Starting by selecting MOSFETs with a Vds of between 20V and 30V might rule out some higher voltage FETs that are better suited to lower voltage designs. Failing that, download all the results to a spreadsheet and sort from there. I have never had much luck with the parametric searches on MOSFET websites.
Alternatively, download all the MOSFET characteristics into a spreadsheet, remove the ones that don't meet the VDS and ID requirements, then add a column called FOM (Figure of Merit). This column should contain the value RDSON x QG. Then sort by this column and pick the FET with the lowest FOM. This part will be the best compromise between RDSON and QG and ideal for the top MOSFET.
The standard LTspice circuit for the LT3757 uses a Fairchild FDS6680A (QG = 27nC, RDSON = 15mOhms). Changing this to an Infineon BSC018NE12LS (QG = 19nC, RDSON = 1.8mOhms) gives a 5% efficiency improvement in LTspice simulations.
Rectifier Diode Choice
When the MOSFET switches off, the inductor voltage ramps rapidly in order to maintain current flow. Many diodes are not fast enough to react to this voltage change, resulting in a large spike on the Drain of the MOSFET. This can (and does) destroy the MOSFET.
Therefore Schottky diodes should be used in all dc/dc converter designs where the inductor voltage has to be rectified. Ultra fast diode have a response time of 10’s of nanoseconds, standard rectifier diodes have a response time of several microseconds, whereas a Schottky has a response time in the order of a few nanoseconds. Schottky diodes also have a much lower forward voltage drop (0.3V) compared with standard rectifiers (0.6V) so half the power is wasted as a result of VxI losses.
When choosing a Schottky diode, the key parameters are: forward voltage drop (should be as low as possible), forward current (this should be greater than the sum of the peak currents in L1 and L2) and reverse voltage rating. When the FET is charging the inductor, the anode of the Schottky diode will be at -Vin and the cathode will be at Vout, so the reverse voltage rating of the Schottky should be greater than (Vin + Vout).
In this design example, the MBRS340 is a good choice with a reverse voltage rating of 40V and a forward voltage of 0.53V at 3A peak current.
Output Capacitor Choice
Unlike the buck converter that has a continuous current flowing from the inductor into the output capacitor, the buck-boost converter output capacitor has to keep the output voltage alive when the inductors are being charged (and is hence disconnected from the output). Therefore there will be a component of the output ripple due to the discharge of the output capacitor. In addition, when the inductors are discharging, the output capacitor will experience an inrush of current and any ESR (effective series resistance) in the capacitor will also result in ripple.
Therefore the output ripple is made up of 2 components: the ripple caused by the output capacitor discharging when the inductors are being charged and the ripple caused by the inrush current from the inductors into the ESR of the output capacitor.
The ripple caused by the discharge of the output capacitor while the inductor is charging is dictated by
where i is the load current in Amps, C is the output capacitance in Farads and dv/dt is the change in output voltage during the ON time of the MOSFET.
Earlier we calculated that the MOSFET switches on for a period of 1.06us. If we require a discharge ripple of 0.5% (25mV) with a load current of 1A, this implies we need a capacitance of
or 42uF.
Note that when the inductors are charging, there is zero current flowing in the rectifier diode. When the MOSFET switches off, the diode current jumps from 0A to the sum of the peak inductor currents, so it is the peak inductor current, not the ripple current amplitude that determines this component of the output ripple (compare this with the ripple in a buck converter that is determined by the ripple current amplitude, not the peak inductor current).
The ripple caused by the ESR is a product of the peak inductor current and the ESR. In our example the peak current is 2.78A and the ESR is of a typical ceramic capacitor is 10m Ohms, giving a ripple of 28mV. Two capacitors in parallel yields an effective ESR of 5m Ohms and halves the ESR ripple to 14mV.
Therefore two 47uF ceramic capacitors should ensure our output voltage ripple is within spec.
Figure 5 shows the output voltage ripple and diode current.
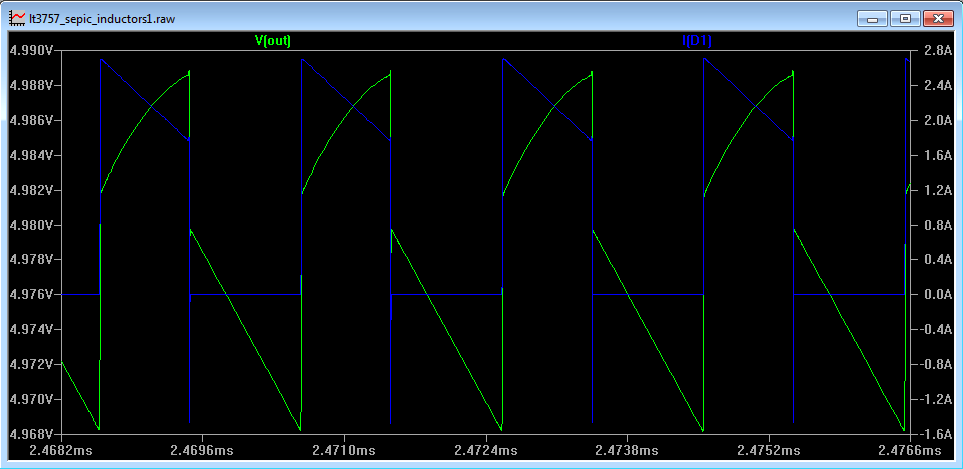
Figure 5
The peak diode current is 2.8A and it can be seen that this generates a sharp rising edge on Vout of 14mV as it flows into the effective 5mOhm ESR. The output capacitor voltage continues to increase, but at a reducing rate as the diode current ramps down.
Other points to note
The feedback resistor values can be calculated using the Feedback Resistor Calculator:
Other points to note
The feedback resistor values can be calculated using the Feedback Resistor Calculator:
The feedback resistors were picked as 20k and 42.2k so that a 5V output keeps the feedback point at 1.6V. Some engineers make these resistor values way too big in the hope of conserving wasted current in the feedback loop. However, this can have a negative effect in that too high resistor values (over 500k Ohms) can cause a phase shift created by the internal capacitance of the feedback pin and the large external resistor values which will lead to poor stability. In lower power designs (where feedback current is important), bypassing the top feedback resistor with 100pF overcomes this issue by providing a phase lead that counteracts the phase lag created by the input capacitance.
The final LTspice circuit using individual inductors is shown in Figure 6. It can be downloaded here:
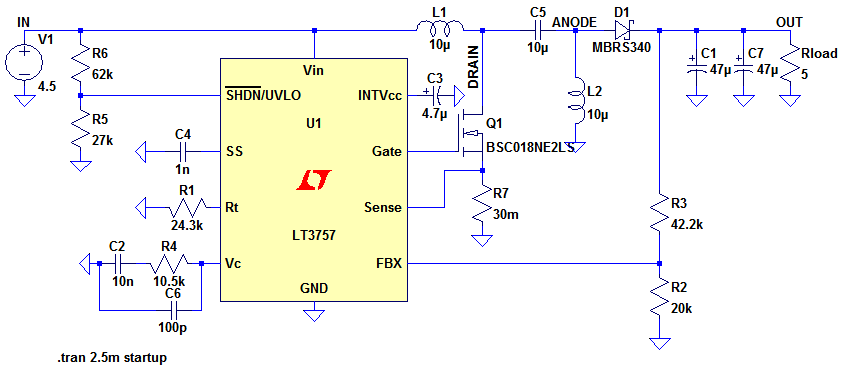
Figure 6
The final LTspice circuit using coupled inductors is shown in Figure 7. It can be downloaded here:
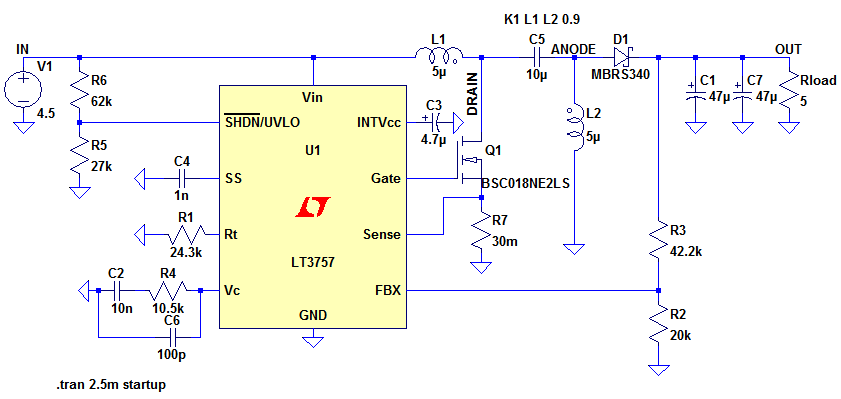
Figure 7
LTspice is a registered trademark of Analog Devices Inc
Sitemap: www.simonbramble.co.uk/sitemap
© Copyright Simon Bramble